My Fast.ai Lesson 2 of Course 22
A walkthrough of the steps taken to run Fast.ai lesson 2 of Course 22
This is a walkthrough of lesson 2 of the fastai course 2022 edition. The lesson aims to teach us about deploying a model using a web application.The first part of this post will be trying the steps of the lesson which involves putting a cat vs dog classifier into production. The second part will try to do the same with the moth vs butterfly classifier created as part of lesson 1.
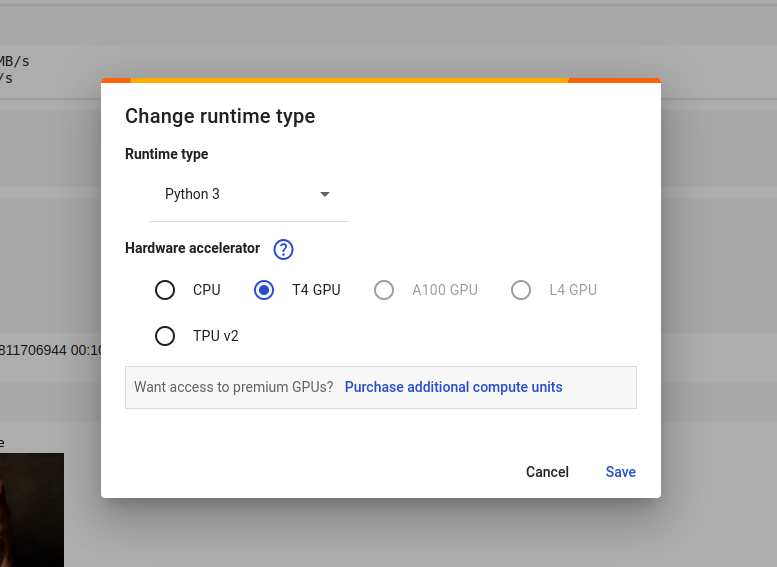
Check runtime is set to T4 GPU
Since we’ve experienced slow runtimes previously with CoLabm we check to make sure our runtime is correctly configured.
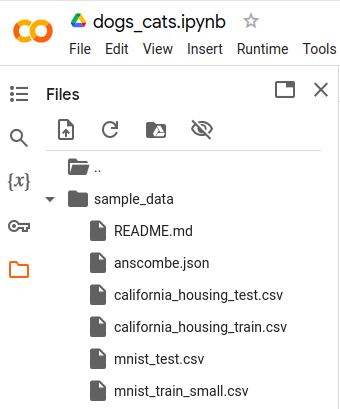
Check files present before model.pkl is generated
Before we run the cells if we go to the “Files” section of the notebook and observe
the contents we can see that there is no model.pkl file. This is the file we want
to generate and export.
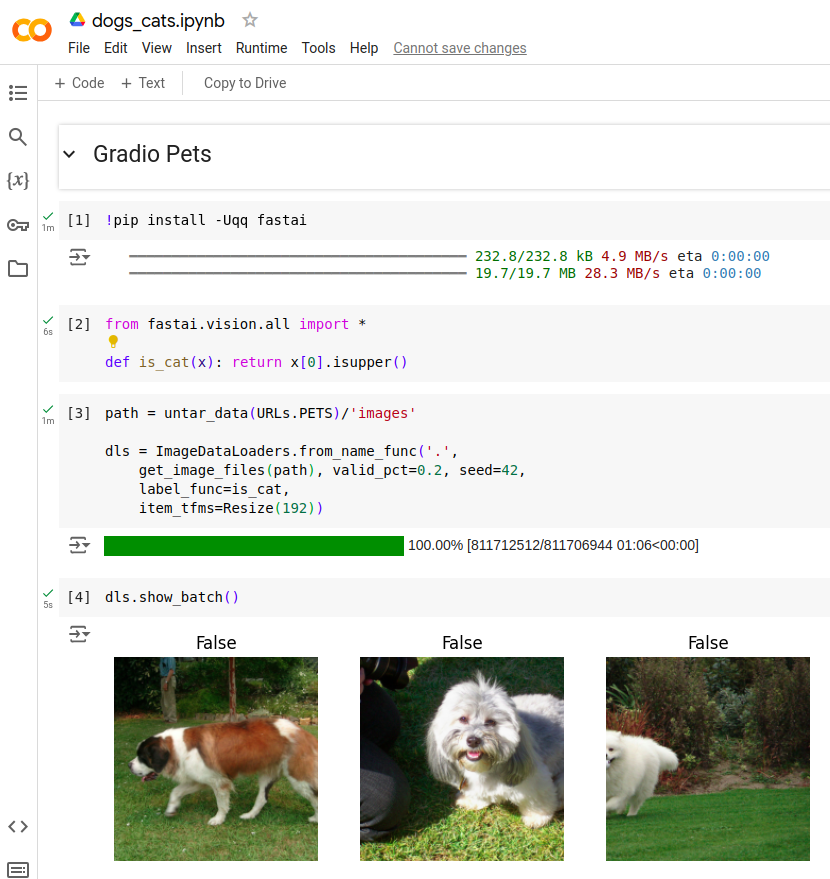
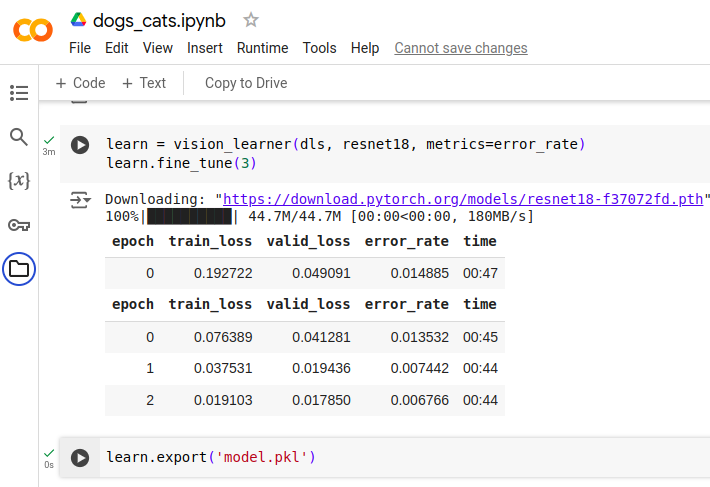
Run the cells in the notebook
Next we run all the cells in the notebook. The first four cells do the following:
- Pip install fastai
- Import package
fastai.vision.all - Initialize dataloader by untaring package from
URLS.PETS - Check data using
dls.show_batch()
Next we run the remaining 2 cells
5. Create vision_learner and fine_tune.
6. Export the model.pkl.
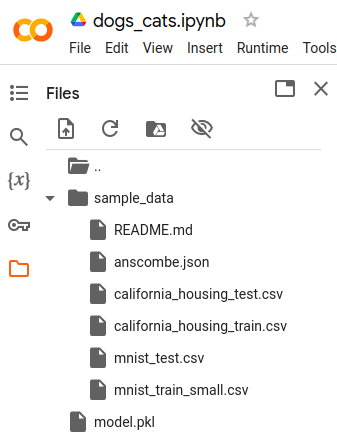
Download the model.pkl
Once all the model.pkl is exported we go to the “Files” section and see the model.pkl
file is created. The file can be downloaded by hovering the mouse over it and clicking
the 3 dots. This brings up a menu which allows us to download the file. Once clicked
there will be a buffering wheel which indicates the progress of the download. Once it
is done it will appear in the “Recent download history” of the browser.
Join Hugging Face 🤗
Time for us to create a Hugging Face account. On the website we click on the “Sign Up” button. After keying in an email address, username and password. A mail shows up in our email inbox and on clicking the link we complete the email verification process.
Create a new space
Next up is to create a new space. We click the “Create new Space” button
Configure the space with a space name and license. Then select the Gradio Space SDK and Gradio template.
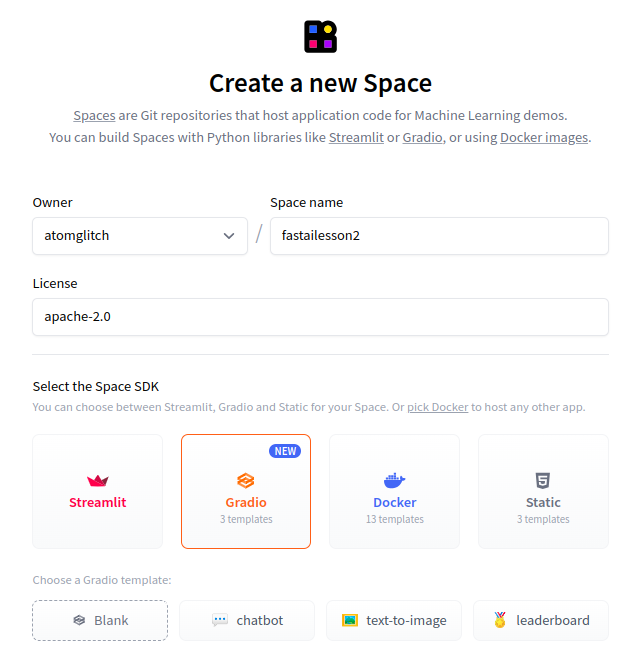
Select the Space hardware using the free option i.e. CPU basic 2 vCPU with 16 GB RAM and configure the privacy settings of the space to be public.

Clone the repo
We update our SSH keys to Hugging Face in the settings. We can check our key setup using the following command.
$ ssh -T git@hf.co
Hi atomglitch, welcome to Hugging Face.
Cloning the repository:
$ git clone git@hf.co:spaces/atomglitch/fastailesson2
Cloning into 'fastailesson2'...
remote: Enumerating objects: 4, done.
remote: Total 4 (delta 0), reused 0 (delta 0), pack-reused 4 (from 1)
Receiving objects: 100% (4/4), done.
If we peek inside there’s only a README.md
Create a greeting app
Following the instructions we create a app.py
import gradio as gr

def greet(name):
    return "Hello " + name + "!!"

demo = gr.Interface(fn=greet, inputs="text", outputs="text")
demo.launch()
Saving the file, committing it and pushing it to the repo
fastailesson2 $ git add app.py

fastailesson2 $ git commit -m "Add application file"
[main c5c9e38] Add application file
 1 file changed, 7 insertions(+)
 create mode 100644 app.py

fastailesson2 $ git push
Warning: Permanently added the ECDSA host key for IP address '3.210.66.237' to the list of known hosts.
Enumerating objects: 4, done.
Counting objects: 100% (4/4), done.
Delta compression using up to 8 threads
Compressing objects: 100% (3/3), done.
Writing objects: 100% (3/3), 432 bytes | 432.00 KiB/s, done.
Total 3 (delta 0), reused 0 (delta 0)
To hf.co:spaces/atomglitch/fastailesson2
   a0b05d3..c5c9e38  main -> main
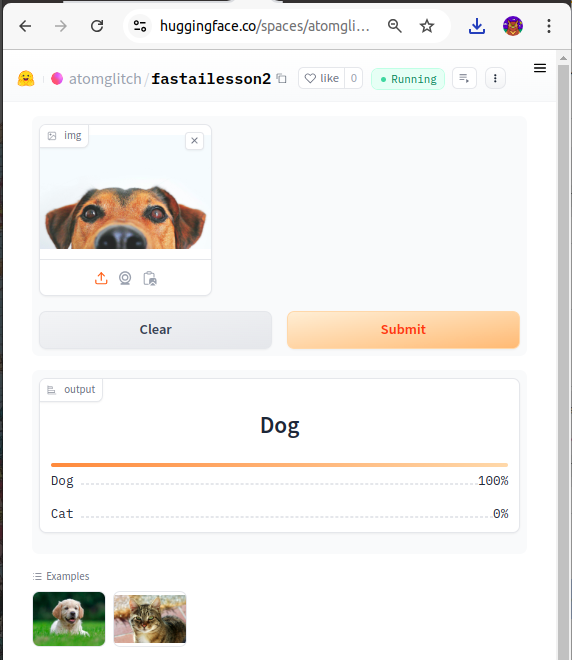
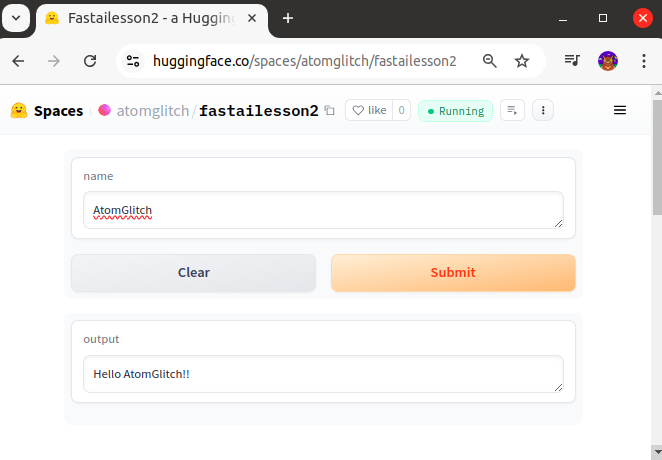
On refreshing the URL after a while we get the app running.
Fastsetup: Installing Conda
Clone fastsetup. At the time of writing this github had moved to use of Github CLI. So we followed the steps to install and authenticate login before running the repo clone command.
$ gh repo clone fastai/fastsetup
Cloning into 'fastsetup'...
remote: Enumerating objects: 387, done.
remote: Counting objects: 100% (242/242), done.
remote: Compressing objects: 100% (56/56), done.
remote: Total 387 (delta 201), reused 209 (delta 186), pack-reused 145 (from 1)
Receiving objects: 100% (387/387), 85.90 KiB | 244.00 KiB/s, done.
Resolving deltas: 100% (230/230), done.
Peeking into the cloned folder we see:
fastsetup$ ls
01-netcfg.yaml  50unattended-upgrades  caddy.sh            domains      getcaddy.sh    LICENSE         msg                   README.md       smtpd.conf         ubuntu-initial.sh.final  ubuntu-wsl.sh.final
10periodic      apt-fast.conf          dkimproxy_out.conf  dotfiles.sh  journald.conf  logrotate.conf  opensmtpd-install.sh  setup-conda.sh  ubuntu-initial.sh  ubuntu-wsl.sh
Run setup-conda.sh
fastsetup $ ./setup-conda.sh
Downloading installer...
PREFIX=/home/conrad/miniconda3
Unpacking payload ...

Installing base environment...

Preparing transaction: ...working... done
Executing transaction: ...working... done
installation finished.
no change     /home/conrad/miniconda3/condabin/conda
no change     /home/conrad/miniconda3/bin/conda
no change     /home/conrad/miniconda3/bin/conda-env
no change     /home/conrad/miniconda3/bin/activate
no change     /home/conrad/miniconda3/bin/deactivate
no change     /home/conrad/miniconda3/etc/profile.d/conda.sh
no change     /home/conrad/miniconda3/etc/fish/conf.d/conda.fish
no change     /home/conrad/miniconda3/shell/condabin/Conda.psm1
no change     /home/conrad/miniconda3/shell/condabin/conda-hook.ps1
no change     /home/conrad/miniconda3/lib/python3.12/site-packages/xontrib/conda.xsh
no change     /home/conrad/miniconda3/etc/profile.d/conda.csh
modified      /home/conrad/.bashrc

==> For changes to take effect, close and re-open your current shell. <==

Please close and reopen your terminal.
With the above installation we have access to conda in our terminal:
fastsetup $ conda --help
usage: conda [-h] [-v] [--no-plugins] [-V] COMMAND ...

conda is a tool for managing and deploying applications, environments and packages.

.
.
.
Fastsetup: Installing Pytorch
The lecture talks about replacing conda with mamba. It also gives us the correct
document to refer to for setting up fastai. It looks like the video is a bit dated so
we follow the steps mentioned in https://docs.fast.ai/#installing.
In the video there’s mention of fastchan which is supposed to be a channel and distribution
to help with the dependencies needed to install fastai. In the docs PyTorch is to be
installed before fastai. The way to go about it is to get the command from PyTorch’s get started.
We choose 11.8 assuming its well supported and more mature than the other versions. This is not based
on any research into the appropriate version to be used. Additionally there’s no mention about
the version to be used in the fastai installation docs.

fastsetup $ conda install pytorch torchvision torchaudio pytorch-cuda=11.8 -c pytorch -c nvidia
Full logs of conda install pytorch
Fastsetup: Installing Fastai
Then we install fastai
fastsetup $ conda install -c fastai fastai
Full logs of conda install fastai
Fastsetup: Installing Nbdev and Jupyter
We also install nbdev which according to the lesson video installs jupyter
fastsetup $ conda install -c fastai nbdev
Full logs of conda install nbdev
Jupyter Notebook not found!
After following the conda installation procedure above we run into an issue:
fastsetup $ jupyter notebook --no-browser
usage: jupyter [-h] [--version] [--config-dir] [--data-dir] [--runtime-dir] [--paths] [--json] [--debug] [subcommand]

Jupyter: Interactive Computing

positional arguments:
  subcommand     the subcommand to launch

optional arguments:
  -h, --help     show this help message and exit
  --version      show the versions of core jupyter packages and exit
  --config-dir   show Jupyter config dir
  --data-dir     show Jupyter data dir
  --runtime-dir  show Jupyter runtime dir
  --paths        show all Jupyter paths. Add --json for machine-readable format.
  --json         output paths as machine-readable json
  --debug        output debug information about paths

Available subcommands: kernel kernelspec migrate run troubleshoot

Jupyter command `jupyter-notebook` not found.
The version of conda installed is miniconda.
Miniconda is a free minimal installer for conda. It is a small bootstrap version of Anaconda that includes only conda, Python, the packages they both depend on, and a small number of other useful packages (like pip, zlib, and a few others).
It looks like we’ll have to install Jupyter notebook. First check the environment.
It should be base. If it’s not run conda activate base.
(base) fastsetup $ conda info --envs
# conda environments:
#
base                  *  /home/conrad/miniconda3
Next we install notebook from the conda-forge channel
(base) fastsetup $ conda install conda-forge::notebook
Full logs of conda install notebook
If we now run the same command that was failing we get the notebook running which can be accessed through the browser
[I 2024-09-03 18:58:52.771 ServerApp] Serving notebooks from local directory: /home/conrad/play/Git/fastailesson2
[I 2024-09-03 18:58:52.771 ServerApp] Jupyter Server 2.14.1 is running at:
[I 2024-09-03 18:58:52.771 ServerApp] http://localhost:8888/tree?token=ce81f25e0fb30209c9cc2d48728821e2e06659bbe4dd8676
[I 2024-09-03 18:58:52.771 ServerApp]     http://127.0.0.1:8888/tree?token=ce81f25e0fb30209c9cc2d48728821e2e06659bbe4dd8676
[I 2024-09-03 18:58:52.771 ServerApp] Use Control-C to stop this server and shut down all kernels (twice to skip confirmation).
[C 2024-09-03 18:58:52.773 ServerApp]

    To access the server, open this file in a browser:
        file:///home/conrad/.local/share/jupyter/runtime/jpserver-2945901-open.html
    Or copy and paste one of these URLs:
        http://localhost:8888/tree?token=ce81f25e0fb30209c9cc2d48728821e2e06659bbe4dd8676
        http://127.0.0.1:8888/tree?token=ce81f25e0fb30209c9cc2d48728821e2e06659bbe4dd8676
Creating a new notebook to make predictions
Now that we have our setup ready let’s try to make predictions with the model trained earlier.
We create a folder for testing this and activate the base environment:
$ conda activate base
(base) $ mkdir -p notebooks/testing
(base) $ cd notebooks/testing
(base) notebooks/testing$
Then we open a jupyter notebook and open it in the browser with the link provided:
(base) notebooks/testing $ jupyter notebook --no-browser
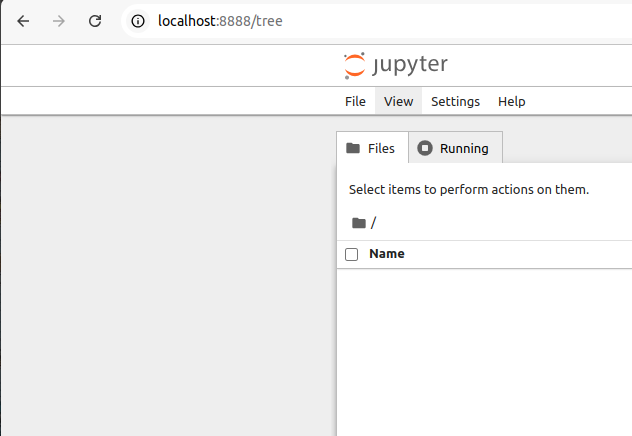
We get this in the browser which is just an empty workspace:
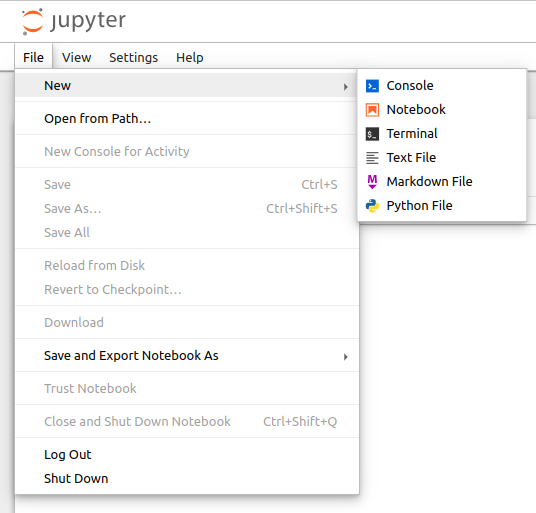
We then open a new notebook to make the predictions:
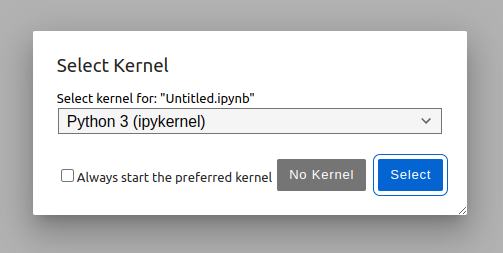
We select the kernel as Python 3:
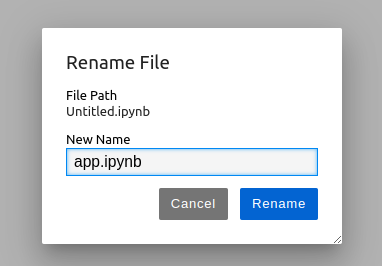
We rename the notebook to app.ipynb:
Writing the testing app.ipynb
The next part was trying to recreate the app.ipynb as Jeremy showed it. It turns out that
we need to install the gradio package as well or else we get the following error:
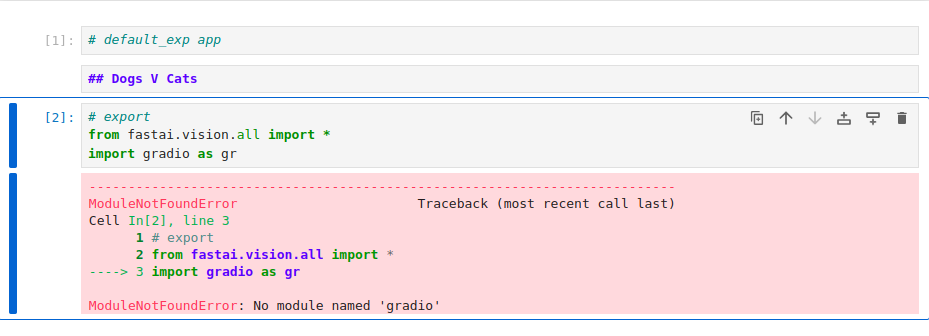
So we go back and install gradio
(base) notebooks/testing $ conda install conda-forge::gradio
There’s another warning that shows up because of the absence of ipywidgets:

So we go back and install ipywidgets
(base) notebooks/testing $ conda install -c conda-forge ipywidgets
Having installed the missing packages gradio and ipywidgets we were able to
continue implementing the app till the definition of classify_image as explained in the lecture
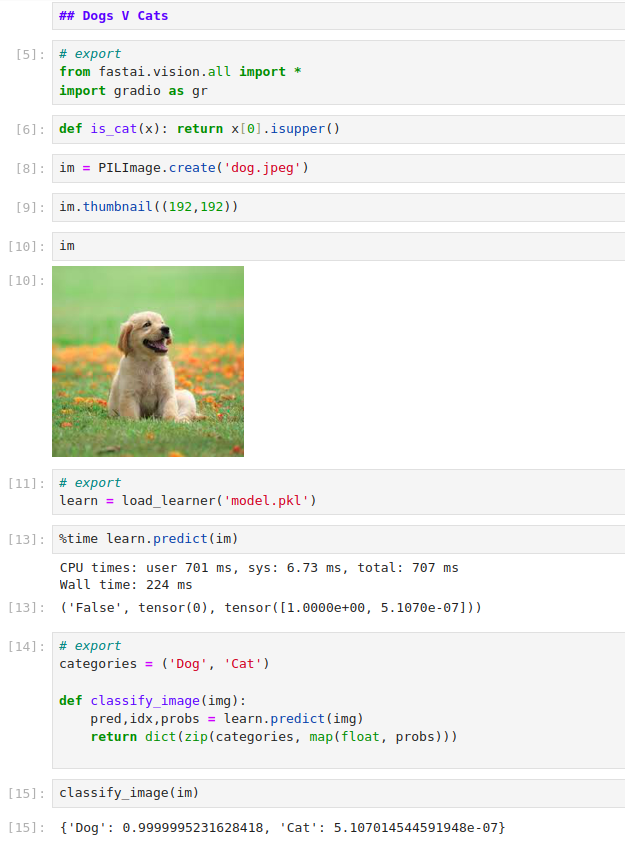
The next part is to create a gradio interface to take an input image and
give its prediciton as the output. The gr.inputs.Image didn’t seem to
work as shown in the lecture. So we had to read up on what the correct usage
is in the gradio image component. Also we go through the documentation
on the gradio label component. With this we modified our cell to create
the gradio interface as follows:
# export
image = gr.Image(width=192, height=192)
label = gr.Label()
examples = ['dog_wiki.jpg', 'cat_wiki.jpg']

intf = gr.Interface(fn=classify_image, inputs=image, outputs=label, examples=examples)
intf.launch(inline=False)
Running the cell we were able to successfully launch the gradio interface:
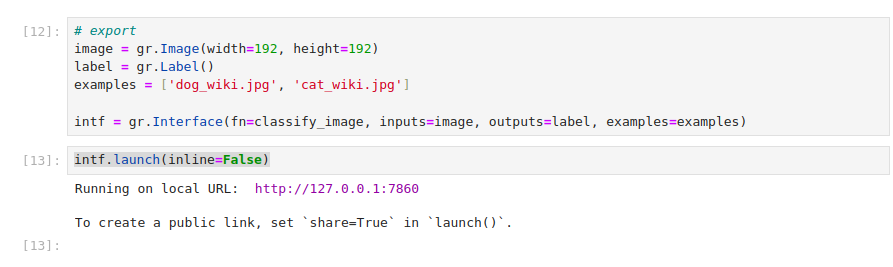
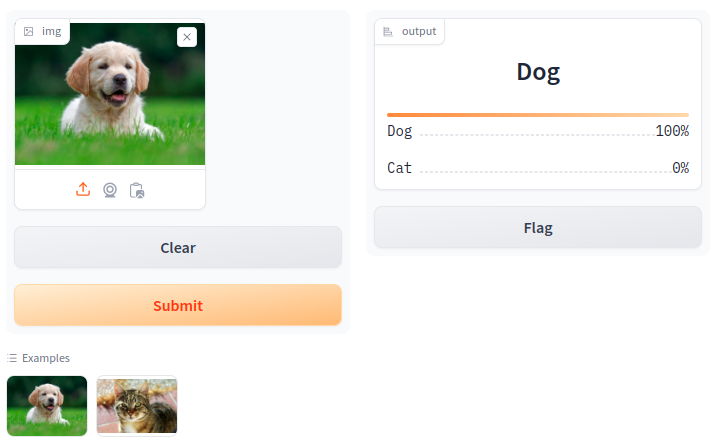
Opening the gradio interface using the URL provided we get the desired image input and label components.
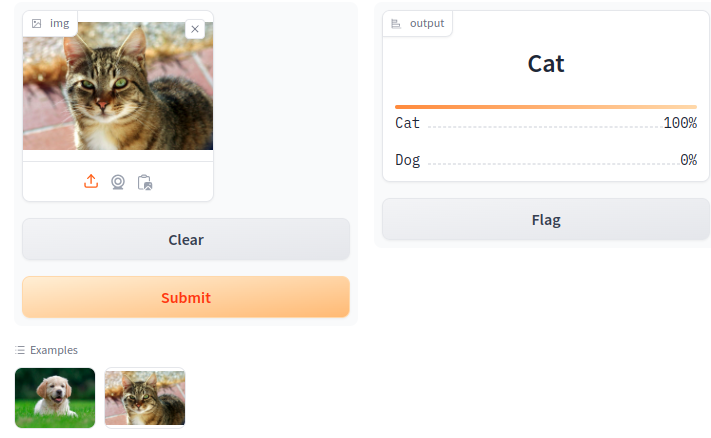
Our test of the dog_wiki.jpg.
Our test of the cat_wiki.jpg.
Turning our testing app.ipynb into a python script
We now try to generate the app.py script that will be used. In the lesson
Jeremy uses notebook2script but it fails for us:
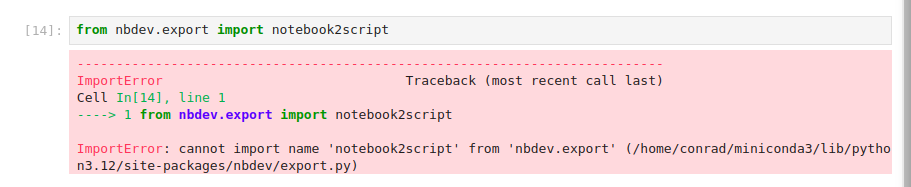
It turns out that notebook2script is deprecated and no longer used. The nbdev package
is a notebook-driven development environment which allows us to do documentation, publishing, continuous integration,
tests and synchronization with a Git repository. There’s nb_export but turns out you have to go through an initialization process
using nbdev_new. If interested please check out their tutorial.
Since we don’t really want to digress at this point lets do this manually.
from fastai.vision.all import *
import gradio as gr

def is_cat(x): return x[0].isupper()

learn = load_learner('model.pkl')

categories = ('Dog', 'Cat')

def classify_image(img):
    pred,idx,probs = learn.predict(img)
    return dict(zip(categories, map(float, probs)))


image = gr.Image(width=192, height=192)
label = gr.Label()
examples = ['dog_wiki.jpg', 'cat_wiki.jpg']

intf = gr.Interface(fn=classify_image, inputs=image, outputs=label, examples=examples)

intf.launch(inline=False)
We go back to our gradio app directory and save the above as app.py. Again we save the file,
commit and push it:
(base) fastailesson2 $ git add app.py

(base) $ git commit -m "Add Image classification"

(base) fastailesson2 $ git push
And on going to the hugging face space we get this failure message:
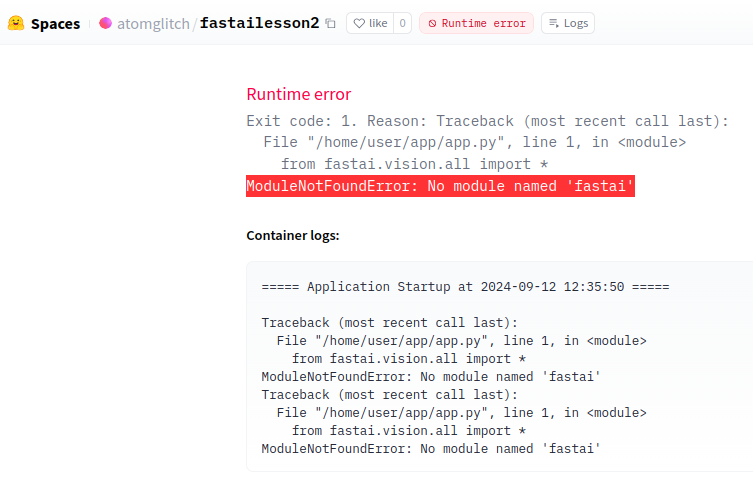
The error is because we’ve not specified the environment with all the module dependencies for our hugging face app. This is fixed through a requirements.txt file in the root of our project directory.
The way to generate the requirements file through conda is:
$ conda activate base
(base) fastailesson2 $ conda list -e > requirements.txt
(base) fastailesson2 $ ls
app.py  README.md  requirements.txt
Again we save, commit and push:
$ git add requirements.txt

$ git commit -m "Add requirements.txt"

$ git push
It looks like huggingface wants to install the modules using pip which cannont understand
the requirements generated by conda.

We then attempted to install pip through conda and use it to create a requirements file.
This requirements.txt file is different from the one generated by conda. We commit it
and push it.
(base) $ conda install pip

(base) fastailesson2 $ pip freeze > requirements.txt

(base) fastailesson2$ git diff requirements.txt
diff --git a/requirements.txt b/requirements.txt
index e90e9cb..06a6759 100644
--- a/requirements.txt
+++ b/requirements.txt
@@ -1,327 +1,201 @@
-# This file may be used to create an environment using:
.
.
+filelock @ file:///work/perseverance-python-buildout/croot/filelock_1701733993137/work
+fonttools @ file:///croot/fonttools_1713551344105/work
+frozendict @ file:///croot/frozendict_1713194832637/work

(base) fastailesson2 $ git add requirements.txt

(base) fastailesson2 $ git commit -m "Update requirements using pip"
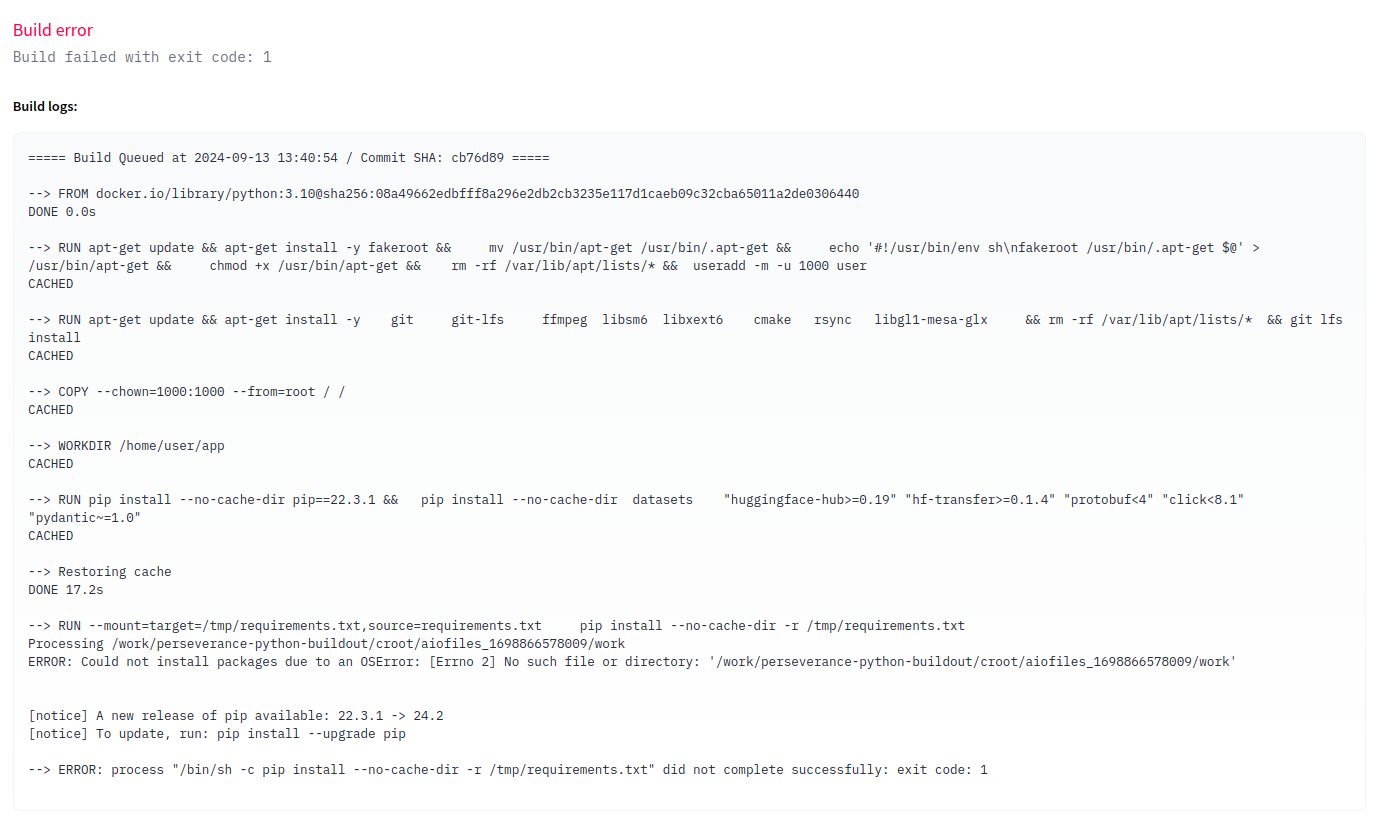
No dice! Looks like huggingface still complaining using pip. This time its complaining
about some OS Error!
Scanning the Fast AI forums for a possible solution yields this
Hugging face is expecting a requirements.txt file so the simplest thing to do would be to create a pip virtual environment and install all the dependancies to that and then export them to a requirements.txt file and push that to hugging face.
This seems a bit convoluted but since we’ve installed pip via conda let’s use it.
Following steps to install packages in a virtual environment using pip and venv
we install the fastai and gradio packages as they are the main module dependencies
or our app.:
(base) fastailesson2 $ python3 -m venv .venv

(base) fastailesson2 $ source .venv/bin/activate

(.venv) (base) fastailesson2 $ which python
/home/conrad/play/Git/fastailesson2/.venv/bin/python

(.venv) (base) fastailesson2 $ which pip
/home/conrad/play/Git/fastailesson2/.venv/bin/pip

(.venv) (base) fastailesson2 $ pip install fastai
Collecting fastai
  Downloading fastai-2.7.17-py3-none-any.whl.metadata (9.1 kB)
.
.

(.venv) (base) fastailesson2 $ pip install gradio
Collecting gradio
  Downloading gradio-4.44.0-py3-none-any.whl.metadata (15 kB)
.
.

(.venv) (base) fastailesson2 $ pip freeze > requirements.txt

(.venv) (base) fastailesson2 $ git diff requirements.txt
diff --git a/requirements.txt b/requirements.txt
index 06a6759..ae59295 100644
--- a/requirements.txt
+++ b/requirements.txt
@@ -1,201 +1,103 @@
-aiofiles @ file:///work/perseverance-python-buildout/croot/aiofiles_1698866578009/work
-altair @ file:///work/perseverance-python-buildout/croot/altai
.
.

(.venv) (base) fastailesson2 $ git add requirements.txt

(.venv) (base) fastailesson2 $ git commit -m 'Update requirements using pip'
[main a45aa53] Update requirements using pip
 1 file changed, 103 insertions(+), 201 deletions(-)
 rewrite requirements.txt (99%)

(.venv) (base) fastailesson2 $ git push
With this we move past the python pip module dependency issue and run into something more familiar. We have to also add all the files required by the app.
(.venv) (base)  fastailesson2 $ git add cat_wiki.jpg dog_wiki.jpg model.pkl

(.venv) (base) fastailesson2 $ git commit -m 'Uploading files required by the app'
[main 1a8d02e] Uploading files required by the app
 3 files changed, 3 insertions(+)
 create mode 100644 cat_wiki.jpg
 create mode 100644 dog_wiki.jpg
 create mode 100644 model.pkl

(.venv) (base) conrad@conradpc:~/play/Git/fastailesson2$ git push
And finally our app is online and working!